kashk-e-bademjun-eggplant-dish

kashk-e-bademjun-eggplant-dish

A plate of eggplant dish known as Kashk-e Bademjun in Iran

Going through the menu in an Iranian restaurant, you can find Kashk-e Bademjun among appetizers. It’s a kind of traditional food cooked and served throughout Iran. Outside Iran, some people call it eggplant dish. Two main ingredients in this Iranian appetizer have made the name:

Kashk, whey, is a whitish dairy product made from yogurt or sour milk, and has been used traditionally in Iranian cuisine. It’s produced through a long process and the final product comes out as dried solid pieces or a thick liquid. It can be both eaten plain and used in cooking. This sour dairy product is available in most Middle Eastern markets. And Bademjun is the Persian equivalent for eggplant.

Although Kashk-e Bademjun is mostly regarded as an appetizer, it can be also served as a light meal for dinner.

Ingredients of Kashk-e Bademjun:

  • 4 medium eggplants, peeled
  • 2 medium onions
  • 2 garlic cloves (optional)
  • ½ cup ground walnut (optional)
  • 1 cup liquid Kashk
  • 2 tsps. crushed dried mint leaves
  • Salt, black pepper powder, and turmeric powder, to the taste
  • Cooking oil

Directions to Cook This Savory Iranian Appetizer

1. Full a big bowl to half with cold water. Dissolve about 1 tablespoon salt in it. Slice the eggplants lengthwise into 3 or 4 pieces and soak them in the bowl for about 1 hour.

Note:

  • By doing so, you season the eggplants and prevent them from getting dark while preparing them to fry. In addition, in this way, they absorb less oil while frying.

2. In a colander, Rinse the eggplants with cold water and let them drain. Then, immediately, fry them in a pan over medium heat until golden brown at both sides.

Notes:

  • You should fry the eggplant immediately after draining because they get dark so soon when they are peeled and exposed to air.
  • You can drain the fried eggplants on paper towels for a few minutes.
  • The eggplants could be grilled instead of fried. In this way, you would have this Iranian appetizer low in fat.

3. Mash the prepared eggplants using a potato masher or a fork until it gets chunky, not a complete paste. Set it aside.

4. Grate one of the onions and the garlic cloves. Fry them over medium heat until golden. Add about 1 teaspoon turmeric powder. Stir for a few more minutes, and then remove it from heat.

Note:

  • The onion could be sliced into thin slivers or diced, and the garlic could be minced instead of grated.

5. In a pot, mix the mashed potato, prepared onion and garlic, and ground walnut. Set the mixture aside.

6. Dilute the kashk with about ½ cup cold water in a boiling pot. Put it over high heat to bring it to a boil. Then reduce heat to low, and let the kashk boils for about 20 minutes. Meanwhile, you can prepare the mint and remaining onion.

7. Slice the other onion into thin slivers. Fry it until golden. Add a little turmeric powder. Stir a few more minutes. Remove it from heat and set it aside.

8. Heat 2 tablespoons oil in a frying pan over low heat until sizzling. Add the mint. Stir it continuously and continue heating for just 1 minute. Then remove it quickly from heat because it can easily burn.

9. Mix the boiled kashk and 2/3 of prepared mint with the eggplant mixture thoroughly. Heat the pot for about 15 minutes with the lid off. When the eggplant is completely tender and you have a thick and paste like mixture, it’s ready to serve.

Notes:

  • You can modify the amount of kashk, walnut, and garlic to adjust them to your taste.
  • Since kashk is a little salty, usually there’s no need to add salt to your Kashk-e Bademjun while cooking. However, you can check it and add a little bit salt if feel necessary.
  • If kashk is not available, you can substitute it with sour yogurt. In that case, you can’t heat the eggplant mixture containing yogurt. So, add about ½ cup water to the mixture. Put it over medium heat for about 15 minutes until the eggplants are completely tender. Remove the pot from heat and let it cool down a little bit. Then add yogurt and mix it thoroughly. Adjust the amount of salt to your taste.

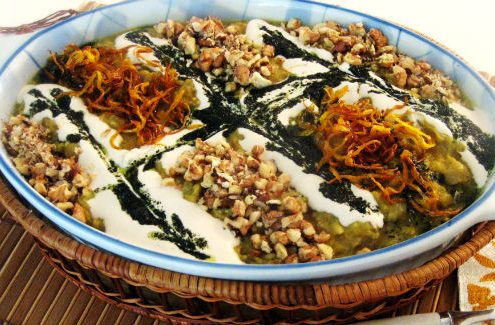
How to Serve Eggplant Dish:

Transfer this Iranian appetizer into a serving bowl. Use some more kashk and walnut, fried onion slivers, and the remaining sautéed mint to garnish. This food can be served with table vegetables, pickles, and sliced raw onion. And like most of Iranian traditional foods, Doogh accompanies the meal as a favorite drink.

Spoon a small amount of Kashk-e Bademjun onto a piece of bread and put it in your mouth. The taste and smell is so tempting that you’ll be hooked.

Ratepost
dizi-traditional-persian-dish

dizi-traditional-persian-dish

Dizi along with table vegetables, Sangag bread, etc.

It dates back to hundreds of years ago when Iranians made this food called Dizi. The reason for such naming is that people traditionally cooked and served it in small stone dishes called Dizi. It’s actually the name of the container. Iranian traditional restaurants still use these stone dishes for this food.

Iranians also call this traditional Persian dish Abgoosht, which literally means “meat broth”. This high-calorie food, which is a good source of protein, is more common and preferred in winter. It would be originally made with lamb and chickpeas only before tomatoes and potatoes were introduced to Iranian cuisine and developed the recipe.

Meat and beans are the major ingredients of Dizi, but in some areas locals may add different things to the recipe based on their tastes. For example, in northern parts of Iran, garlic, and in Kerman province, people may add caraway for seasoning. In Armenia, people cook a similar food too.

Follow the recipe and cook this popular and nutritious food at your home.

Ingredients to Cook Dizi:

  • 500 g bone-in lamb (shank, shoulder, or short ribs), cut into medium-size pieces
  • ½ cup chickpeas, pre-soaked overnight
  • ½ cup white beans, pre-soaked overnight
  • 1 large onion, roughly chopped
  • 2 peeled garlic cloves (optional)
  • 1 tsp. turmeric powder
  • 4 dried lime
  • 2 medium tomatoes, halved
  • 2 medium potato, cut into four pieces
  • 1 tbsp. tomato paste
  • 1 cup sour grapes (optional)
  • Salt, black pepper powder, and lime juice, to the taste
  • Dried mint leaves, for seasoning (optional)
  • Dried tarragon leaves and fresh mint leaves, for garnishing

Directions to Cook This Traditional Persian Dish:

1. Put the lamb, chickpeas, white beans, chopped onions, and garlic cloves in a pot. Sprinkle turmeric and pepper powder. Then add about 6 cups of water and bring them to a boil.

Notes:

  • Don’t remove the meat’s fat. It provides the needed oil for cooking this traditional Persian dish.
  • Some use beef instead of lamb to cook Dizi, but lamb is much more preferred and common.
  • You can substitute white beans with kidney or rose coco beans. Or, you can omit the beans and use chickpeas only. In that case, the amount of chickpeas has to be doubled.

2. While boiling, skim the foam floating on the top. Continue until no more foam is produced. Then, cover the pot and let it simmer over medium heat for about 2 hours until the meat and beans are tender.

3. Add potato, tomato halves, tomato paste, dried limes, and sour grapes. Stir a bit and cover the pot again. Let it simmer for about more 30 minutes.

Notes:

Pierce the dried limes with a fork before adding them to the pot.

  • If you like to have sour grapes in your Dizi, make sure you reduce the amount of dried limes and lime juice. Otherwise, your food may taste more sour than desired.
  • If you heat the tomato paste with one tablespoon of oil for a few minutes in a frying pan before adding, it’ll give the stew a better color and flavor.

4. In the last 15 minutes, add salt and lime juice.

Note:

  • Adding salt from the beginning prevent the meat to cook properly, and thus, it takes more time to get your food ready.

5. Finally, when all ingredients are completely tender, you’re done with the cooking phase.

Note:

  • If you feel the food needs more time to be over heat, don’t worry. Let it simmer for more time. Just watch it not to lose too much water.

6. Put a colander over a big bowl and drain the ingredients. Set the broth aside.

7. Remove the bones from the meat. Transfer the ingredients to another bowl and mash them all up into a paste.

Note:

  • In case of using shanks, If you like, you can remove the morrow from the bones and add it to the broth or to the mashed up ingredients.

8. Taste the broth and paste for seasoning, and then, get ready to serve.

9. If you’re going to use dried mint for seasoning, heat 1 tablespoon oil in a frying pan over low heat until sizzling. Crumble the mint leaves in your hand and add them to the oil. Stir it continuously and continue heating for just 1 minute. Then, remove it quickly from heat or it can easily burn. Add the sautéed mint to the broth.

How to Serve Dizi:

This traditional Persian dish has to be served hot, otherwise, you spoil the its taste. The other point is that you should serve the broth and the paste in separate dishes – the broth in a bowl with crumbled tarragon leaves sprinkled on the top, and the paste on a plate garnished with fresh mint leaves.

An interesting part of serving this food for guests is to let them mash the ingredients themselves, and it’s what happens in almost all traditional restaurants in Iran. While serving Dizi, the waiters offer guests meat smashers to crush the ingredients if they like to have it in form of a paste. This is only an offer, because some people prefer it unmashed.

You should have the broth first in your preferred way. To get started, tear a sheet of bread into small pieces and soak them in the broth. Then use a spoon to stir it a bit and eat this delectable mixture. What you make with your broth is called Terid in Persian. Afterward, go for the paste. Spoon a small amount onto a piece of bread and put it in your mouth. Bon appetite!

The Kind of bread commonly preferred with Dizi is Sangak, an Iranian traditional bread. Iranians serve table vegetables, sliced raw onion, yogurt, and various kinds of pickles alongside this traditional Persian dish. And to drink, Doogh (Iranian yogurt drink) is the best and most common option.

Table vegetables are the best side dish you can have with this food because they help it get easily digested. You can season table vegetables and sliced onions with a little bit lime juice and salt.

I hope you cook this convenient and nutritious Persian food and enjoy its unforgettable taste.

Ratepost
tahchin-Pesrian-rice-cake

tahchin-Pesrian-rice-cake

A dish of Tahchin, The famous Persian Rice Cake

Apart from an amazing taste, it’s a good-looking Iranian food, and that’s why it’s an integral item on the menu of almost every restaurant, party, or formal ceremony in Iran. In Persian, “tah” means “bottom” and “chin” means “arrange”. So, the reason for such naming is that you have to arrange the ingredients and layer them up from the bottom of a dish to prepare them for cooking.

There are different versions of Tahchin all of which mainly involve layering rice and a kind of meat or vegetable. But one made with chicken is the most common and favored version of this Persian rice cake. And what’s come below is the recipe for it.

Ingredients to Cook Tahchin:

  • 4 cups rice, pre-soaked for about 2 hours
  • 800 g chicken, bone-in (preferably breast)
  • 1 big onion, chopped
  • 1 cup sour dripped yogurt
  • 2 tsps. crumbled saffron threads
  • 1 egg
  • 1 cup chicken stock
  • Cooking oil
  • Salt and black pepper powder, to the taste
  • 1 tsp turmeric powder
  • 50 g butter (optional)
  • 1 cup dried barberry, pre-soaked for about 1 hour, for garnishing
  • ½ cup almond slivers, for garnishing
  • ½ cup pistachio slivers, for garnishing

Directions to Cook Persian Rice Cake:

1. Add 3-4 small ice cubes to the crumbled saffron in a cup. Set it aside and let the ice cubes melt slowly.

2. Cook the chicken in a pot with chopped onions, salt, turmeric powder, about 2 cups of boiling water, and 1 tablespoon of oil until it’s tender.

3. Take out the chicken and let it cool down. Then remove the bones and made chicken strips using your hands.

4. Drain the pre-soaked rice and add it to a pot of boiling water. Add some salt and simmer until al dente (soft on the outside, but a little bite left on the inside). Then drain it and rinse with cool water.

5. In a bowl, mix the dripped yogurt, prepared saffron, salt, pepper powder, and 1 tablespoon oil thoroughly. Take about ¼ of the mixture and set it aside. Then add the egg to the remaining part and whisk them.

Note:

  • You can change the amount of saffron a little bit if you like your Tahchin with more or less color and flavor.

6. Take a nonstick baking pot and spread 1 tablespoon of oil at the bottom of it.

7. Mix 2 cups of the prepared rice with about half of the yogurt and egg mixture in a bowl. Then, spread it at the bottom of the pot and get it flat with the back of a tablespoon.

8. For the second layer of your Persian rice cake, mix the chicken strips with the second half of the yogurt and egg mixture and spread it evenly on the first layer.

9. For the third layer, cover the chicken strips with the remaining rice.

10. Mix 1 cup of chicken stock with the ¼ of the yogurt mixture you’d set aside and Spread it over the surface of the rice. Then, using the back of a large spoon put a little pressure on the rice to help the layers of your Tahchin stick together properly.

10. Cut up the butter and put the pieces on the rice. They will melt while cooking and give a delicate flavor to the food.

11. Cover the pot and put it over medium heat for about 5 minutes. Then reduce heat to low and continue heating for about 1:30-2 hours. When the sides are golden brown and the rice is fluffy, it’s ready to serve.

Notes:

  • The bottom of the rice cake gets darker than the sides, so be careful not to overheat.
  • Adding too much chicken stock, or spending more time for simmering the rice than what mention in the instruction makes your Tahchin mushy.
  • The more the rice gets softer than al dente, the less amount of chicken stock and yogurt is needed.
  • To cook this Persian rice cake, you can also use oven (Preheated 400 F, the lowest rack, for about 1 hour and 15 minutes). In this case, cover the dish with foil before heating. The required time adjustment depends on the type of the oven you use.

The Flavor of Creativity! Use a jumbo cupcake pan instead of the pot and serve your guests smaller personal-size Tahchins.

12. Fry the dried barberry, and almond and pistachio slivers with 1 tablespoon of oil for a few minutes, and set them aside for garnishing.

Notes:

  • They can be mixed, or fried separately.
  • If you don’t like the sour taste of barberry, add a little sugar to it to balance the taste. Stir until the sugar is melted and then remove from heat.

How to serve:

Remove Tahchin from heat and Let it cool down for about 10 minutes. Then place a serving platter over the pot and invert it. Use the prepared barberry, almond, and pistachio to garnish. Dripped yogurt can be also used for decoration if you like. Before eating, the rice cake has to be cut into pieces with a knife.

Everybody takes a piece in their plates and enjoys the taste using a spoon and a fork. This Persian food is usually served with table vegetables, various kind of pickles, green salad, or Shirazi salad (a kind of cucumber and tomato salad flavored with sour grape juice or lemon juice attributed to Shiraz).

The outer layer, which is crispy golden brown, is the most favored part of this food. To be honest, I die for it, and I think most Iranians have the same feeling. In Persian, it’s called Tahdig which means the bottom of the pot because it’s the crispy layer made at the bottom of the cooking pot.

It may takes some time to learn how to adjust the proportion of ingredients to each other to have a perfect Tahchin. But when you gain mastery in doing this, at the moment you invert this Persian rice cake on a platter with that eye-catching golden brown look, it gives you the impression of a professional cook. That’s really enjoyable, believe me.

Ratepost
mirza-ghasemi

mirza-ghasemi

A Plate of Mirza Ghasemi ready to be served

Travelling to the north part of Iran, specifically Gilan province, Mirza Ghasemi is one of the most popular dishes you hear about. It dates back to Qajar period when Mohammad Ghasem Khan, the governor of Rasht (the capital of Gilan), made this food for the first time. So it was named after him, and gradually, went through across the country. It’s usually served as an appetizer.

It takes you a little time to prepare the ingredients and cook this Iranian appetizer. More importantly, it’s a healthy food mainly consisting of vegetables. What follows is the recipe for popular, time saving, healthy Mirza Ghasemi.

Ingredients to cook Mirza Ghasemi:

  • 6 medium eggplants, unpeeled
  • 5 garlic cloves, grated or minced
  • 2-3 medium tomatoes, grated or diced
  • 2-3 eggs
  • 1/3 cup Cooking oil
  • 1 tsp. turmeric powder
  • Salt and pepper powder
  • Fresh parsley and mint leaves, for garnishing

Directions to prepare Mirza Ghasemi:

1. Wash the eggplants under cold water properly.

2. Grill the eggplants over hot coals, on stove, or in oven until the skin is charred and they get tender. Then let them cool down for a few minutes. Take the skin off and dice them. Set side.

3. In a pan, fry the prepared garlic with turmeric powder over medium heat until slightly golden. Then add the prepared eggplants and mix them.

Note:

  • You can substitute oil with butter if you like the flavor.

4. Add the prepared tomatoes, salt, and pepper, and mix. Cover the pan and let the mixture simmer for about 15 minutes over medium heat. Stir a few times.

Notes:

  • If you like, remove the skin of tomatoes before dicing or grating. To make it easier, score an X at the bottom of each tomato and blanch them for about 1 minutes. This way, the peeling process can happen rather quickly and effortlessly.
  • If you’re not satisfied with the color of your Mirza Ghasemi, add some tomato paste to your taste and continue heating for a few more minutes.

5. When the mixture is not watery anymore, it’s time for the eggs.

6. Crack the eggs into a bowl. Season them with salt and pepper, and whisk.

7. Add the prepared eggs to the pan. Stir until the eggs are cooked and well mixed with the eggplant and tomato. Then it’s ready to serve.

Note:

  • You can crack the eggs directly on top, sprinkle some salt and pepper, and leave them whole. Or you can mix the egg whites with a knife gently and leave just the yolks intact. Anyway, in this case, cover the pan for a few more minutes to get the eggs cooked.

How to Serve This Iranian Apetizer:

Transfer the food into a bowl or onto a plate and use parsley and mint leaves to garnish. Then serve it with bread or rice. As an appetizer, it would be better to serve Mirza Ghasemi with bread. Sangak (an Iranian traditional bread) is the most preferred kind of bread to have with this Iranian appetizer.

Spoon a small amount of Mirza Ghasemi onto a piece of bread or the rice you have in your plate and enjoy your meal. Table vegetables, yogurt, green salad or Shirazi salad, and thinly sliced cucumbers are the common possible side dishes for this food. And as usual, yogurt is the most favored drink.

This traditional food is included in almost everyone’s list for tasting local foods while travelling to the north of Iran. It can be true about you, too, especially if you’re a vegetarian.

Ratepost
morassa-polo-persian-food

morassa-polo-persian-food

Morassa Polo, A Persian Food for formal ceremonies and Parties

Morassa Polo is one of the best options for serving in formal ceremonies or parties especially weddings. “Morassa” means “jeweled” and “polo” refers to the cooked rice. In fact, the use of colorful ingredients in this Persian food is the reason for such naming.

It dates back to Safavid period when Morassa polo was innovated. At that time, Persian cuisine had a considerable progress and such ceremonial foods came to existence. Shiraz is the origin of this Persian dish but it’s cooked and well known enough all over Iran. It’s a popular dish even in some foreign countries.

Ingredients to Cook Morassa Polo:

  • 5 cups rice (presoaked for about 2 hours)
  • 800 g. boneless chicken breast (skinless)
  • 2 medium onions, diced
  • 1 cup almond slivers
  • 1 cup pistachio slivers
  • 1 cup raisins (presoaked for about 30 minutes)
  • 1 cup finely slivered orange rind (sweetened and dried)
  • 1 cup dried barberry (presoaked for about 30 minutes)
  • 2 tsp. crushed saffron threads (presoaked with 4-5 small ice cubes)
  • Cooking oil
  • Salt, sugar and turmeric powder

Note:

  • To have sweetened orange rind slivers follow the instruction below (By sweetening I mean preparing the orange rind so that its bitter taste is removed):

Bring a pot of water to a boil. Add the orange slivers. Let it simmer for about 10 minutes. Then change the water and repeat the process once more. Afterward, soak the slivers in cold water for 1 or 2 days (until they don’t taste bitter anymore). Meanwhile, change the water 3 or 4 times. Then drain and spread them onto a tray to dry. In this way, you have orange rind slivers sweetened to use for cooking any kind of Persian food.

Directions to Cook This Persian Food:

1. Drain the presoaked rice and add it to a pot of boiling water. Add some salt and simmer until al dente. Then drain it and rinse with cold water.

2. Spread about 1 tablespoon oil at the bottom of a nonstick baking pot. When it starts sizzling over medium heat, add the prepared rice. Cover the pot and after about 5 minutes reduce heat to low (it helps you to make a better tahdig). Let the rice cook gently until fluffy. Meanwhile, you have enough time to prepare other ingredients.

3. Cut the chicken into medium size pieces.

Note:

  • You can use other parts of a chicken as well for this Persian food. The only point is that you need the cooked chicken boneless.

4. Fry the onion with about 3 tablespoon oil over medium heat until slightly golden. Add some turmeric powder and continue heating for a few more minutes.

5. Add the chicken pieces and stir until they get golden brown. Add about 2-3 cups boiling water, 1 teaspoon of liquid saffron, and salt. Let it simmer until completely tender.

6. Take out the chicken and let it cool down. Then make thin chicken strips using your hand. Set them aside.

7. Fry the almond and pistachio slivers separately over medium heat just for a few minutes. Set them aside.

Note:

  • To give a better flavor to your Morassa polo, you can presoak the slivers in rosewater with a little bit sugar (to your taste) dissolved in it overnight.

8. In a frying pan, heat some oil. Before it starts sizzling, remove the pan from heat. Add the raisins. Stir as long as the oil is hot and until the raisins get tender. Set them aside.

9. Fry the orange rind slivers with some sugar (to your taste) over medium heat for a few minutes. Set them aside.

10. Fry the dried barberry with some sugar (to your taste) and 1 teaspoon of liquid saffron over medium heat for a few minutes. Set it aside.

Note:

  • You can substitute oil with butter for preparing all these ingredients if you like the flavor.

11. Check the rice. If ready, it’s time for serving the food.

How to serve Morassa Polo

Take about 2 cups of cooked rice. Mix it with the remaining liquid saffron and set it aside for garnishing. Then transfer half of the remaining cooked rice onto a serving platter. Spread the chicken strips evenly on it as the second layer. Cover the chicken with the rest of rice for the third layer.

To garnish, use the prepared saffron rice, almond and pistachio slivers, raisins, slivered orange rind, and barberry. Then spread some oil or melted butter over them. Actually, garnishing is the most important part of serving this Persian food because of an eye-catching appearance produced.

You can serve table vegetables, green salad, and yogurt alongside. The tahdig of your rice as well as the chicken stock can be also served with this Persian food.
Give this food a go. I promise you won’t regret, but also you may fall in love with its amazing flavor and look.

Ratepost
shirazi-salad-Iranian-appetizer

shirazi-salad-Iranian-appetizer

A bowl of Shirazi salad, a popular Iranian appetizer

As the name reveals, Shirazi Salad is originated from Shiraz, capital of Fars province, southwest Iran. It’s mainly considered a refreshing dish during hot summers of Iran although served with many Iranian foods all year round.

It’s one of the most popular green salads among Iranians which is very easy and convenient to make. It has a lot of fans throughout the country. And here, I’m going to share the joy with you and explain how to make the savory Shirazi salad. It will be ready in a very short time.

Ingredients for This Iranian Appetizer:

  • 3 medium size cucumbers (peeled or unpeeled, optional)
  • 2 medium size tomatoes
  • 1 medium size onion
  • Dried mint leaves, crushed
  • Dried or fresh parsley leaves (optional)
  • 1 cup unripe grape juice
  • Salt and black pepper powder
  • 2-3 tbsps. olive oil (optional)

Directions to Make Shirazi Salad:

1. Finely dice the cucumbers, tomatoes, and onion. Then blend them in a large bowl.

Note:

  • Primary ingredients for this Iranian appetizer are what I mentioned here. But if you like, you can add some diced scallion and bell pepper.

2. Add some dried mint and parsley to your taste and mix.

Notes:

  • If the parsley leaves are fresh, you have to mince them, and if dried, crush them before adding.
  • You can also use dried pennyroyal leaves instead of mint.

3. Add the unripe grape juice, salt, and pepper. Adjust the amounts to your taste.

Note:

  • Although unripe grape juice is originally used for seasoning this Iranian appetizer, if it’s not available, you can substitute it with lemon or lime juice.

4. Add the olive oil and mix the ingredients well. Now you’re almost ready to serve.

Note:

  • It would be better to refrigerate your Shirazi salad for about 1 hour before you serve it. In this way, the flavors mingle perfectly and the salad will taste more delicious.

How to Serve This Popular Salad:

Transfer the salad into a big serving bowl or some small ones. You can cut designs into tomatoes, cucumbers, onions, or bell peppers, and use them for garnishing. Just make use of your creativity to do it.

You can serve Shirazi Salad as an appetizer or a side dish with many of Iranian foods, especially those including rice. The pleasant sour and salty flavor alongside the crispy texture you feel in your mouth give you a great taste experience. You’ll be a fan of this popular, traditional salad like most Iranians.

Ratepost
Kookoo-Sabzi

Kookoo-Sabzi

Kookoo Sabzi, an Iranian dish ideal for vegetarians and others

With a tempting aroma and flavor, it comes from a large family called Kookoo with eggs as the basic ingredient. And Sabzi means herbs in Persian. So, Kookoo Sabzi is an egg based vegetarian Iranian dish.

If you don’t have enough time but you want to prepare something enjoyable to eat, this recipe would be a good suggestion.

Ingredients of Kookoo Sabzi:

  • ½ cup minced chives
  • ½ cup minced parsley
  • ½ cup minced dill
  • ½ cup minced cilantro (optional)
  • 4-5 lettuce leaves, minced
  • 3 garlic cloves, minced (optional)
  • 6 eggs
  • 1 tsp. baking powder
  • 1 tsp. turmeric powder
  • 1 tbsp. flour
  • ½ cup chopped walnut (optional)
  • 2 tbsps. dried barberries (optional)
  • 2/3 cup vegetable oil
  • Salt and black pepper powder

Directions to Make This Vegetarian Iranian Dish:

1. Crack the eggs into a big bowl. Add baking powder, turmeric powder, flour, salt, and black pepper powder. Whisk until mixed smoothly.

2. Add the prepared herbs, lettuce, and garlic to the bowl and mix them well. Then, add the walnuts and dried barberries and stir to combine.

Note:

  • Before mincing the lettuce leaves remove the stems.

3. Heat the oil in a nonstick pan until sizzling over medium low heat. Then, transfer your mixture to the pan and get it flat with the back of a tablespoon with a little pressure. After that, cover the pan and let your Kookoo Sabzi cook gently. Tilt the lid.

4. After about 20 minutes, check your food. When the sides look brown, remove the pan from heat.

5. Remove the lid. Place a large plate over the pan and invert the Kookoo onto the plate. Next, slide the Kookoo back into the pan gently.

Note:

  • You can also cut the Kookoo into wedges and then invert them in the pan separately.

6. Cover and continue heating until the other side gets brown, too. Now you have a vegetarian Iranian dish to serve.

Note:

  • it’s better to make your Kookoo Sabzi at most about 3 cm thick. Otherwise, it doesn’t cook properly in the middle.

How to serve Kookoo Sabzi:

Transfer the Kookoo onto a serving platter and cut it into wedges. You can sauté some dried barberry and use it for garnishing along with some chopped walnut. This Iranian dish has to be serve with bread. And as a side dish you can have yogurt, pickles, or Shirazi salad.

Each person can take a wedge on their plates, cut a small piece at a time, and warp it in a piece of bread to eat. To cut the wedge into small pieces, most of the people use a fork or even a spoon, but you can also use a knife if you wish.

If you’re looking for something healthy, delicious, convenient, and quick among Iranian food, I highly recommend you try KooKoo Sabzi.

Ratepost
Koofteh-Tabrizi-Iranian-Dish

Koofteh-Tabrizi-Iranian-Dish

A dish of Koofteh Tabrizi, ready to be served

This traditional dish is one of the specialties in Iranian cuisine. As the name reveals, this Iranian dish is originated in Tabriz, the capital of East Azerbaijan province, northwest of Iran. What makes Koofteh Tabrizi one of a kind among all other Iranian foods is not just the ingredients but the way it gets prepared and cooked.

This recipe may take you much time but the outcome is so delicious that you’ll admit it’s worth trying.

Ingredients Needed for Koofteh Tabrizi:

  • 500 g ground veal (about 85% lean, ground twice)
  • 1 large onion, grated and the juice squeezed out
  • ½ cup half-cooked, yellow split peas
  • 1 cup rice, half-cooked without salt
  • 1 medium potato, boiled and peeled
  • 1 egg
  • ¼ cup finely chopped chives
  • ¼ cup finely chopped parsley
  • 1 tbsp. crushed, dried summer savory (if unavailable, just leave it out)
  • 1 tbsp. crushed, dried tarragon
  • ½ tbsp. crushed, dried mint leaves
  • 1/8 tsp. saffron powder, presoaked using 1 small ice cube
  • Salt, turmeric powder, hot and black pepper powder

The Fillings:

  • 2-3 hard-boiled eggs, peeled
  • 6 yellow prunes, presoaked for about 30 minutes
  • 1 medium onion, finely diced and fried to golden brown
  • ½ cup dried barberry, presoaked for about 30 minutes, drained
  • 1 cup coarsely crushed walnut
  • vegetable oil

For Sauce:

  • 3 tbsps. tomato paste
  • 1 medium onion, finely diced
  • 1/8 saffron powder
  • Cooking oil
  • Salt, turmeric powder, hot pepper powder
  • 3-4 cups hot water

Directions to Cook This Iranian Dish:

1. Process the rice, yellow split peas, and potato all together using a food processor until uniform. Set them aside. Be careful not to over process them to paste.

2. In a large bowl, mix the ground meat and grated onion thoroughly. Note: High fat meat, and also, not squeezing out the onion juice can cause this Iranian dish falling apart while cooking.

3. Add the rice mixture prepared through processing, egg, herbs, liquid saffron, salt, and turmeric and pepper powder. Mix them all completely using your hand. Then, continue kneading for about 10-15 more minutes.

Note:

  • Add the rice mixture, the herbs, and the egg and condiments separately in three phase. Add one of them, mix well, and then add the other one. Mixing and kneading play an important role because it prevents your meatballs from falling apart.

4. Refrigerate your paste like mixture for about 1 hour. Meanwhile, prepare the fillings and the sauce.

Notes:

  • You can also prepare the mixture one day earlier and refrigerate it overnight.
  • It’s even possible to freeze your mixture for up to one month and use it to make Koofteh Tabrizi whenever you feel like it.

5. Sauté the barberry and walnut separately just for a few minutes and set them aside.

6. In a large pot, fry the diced onion with some turmeric powder until golden brown over medium heat.

7. Add tomato paste, salt and pepper. Stir for about one minute and then about 4-5 cups hot water. Stir a bit. Increase the heat to bring it to a boil.

8. Add the saffron. Reduce heat to low. Cover the pot and let the sauce get thick while simmering gently.

9. Line a bowl with a cheese cloth. To fix the cloth, you can use a rubber band around the bowl.

10. Remove the paste like mixture from refrigerator. Knead it a little.

11. Add about half of the mixture to the bowl. Use your fingers to spread it at the bottom and bring it up toward the sides.

Notes:

  • Choose a bowl big enough which can hold half of your mixture.
  • Keep a bowl of cold water next to yourself. To prevent the mixture from sticking to your hands, wet them in cold water then start making meatball.

12. Put 2 hard-boiled eggs at the middle. Add the other fillings all. Then, place the remaining mixture on top and press down with your palm to get the two halves sealed. Go around the edges and make sure they’re sealed.

Notes:

  • You can exclude the Boiled egg from your Koofteh Tabrizi recipe if you don’t like it.
  • Take about one tablespoon of fried onion and one tablespoon of sauté barberries, and set them aside for garnishing this Iranian dish.

13. Tie the cloth closely. Be careful not to leave any corner open. Make a bow since it’s easier to open.

14. Pick up your gigantic meat wrap gently and pass it from hand to hand a few times to shape it like a ball.

15. Go back to the sauce. Remove the lid. Increase the heat to medium to maintain a low boil. Then place your meatball gently into the pot. Within the first 30 minutes, don’t cover the pot and also don’t move or turn the Koofteh.

16. By the end of 30 minutes, the Koofteh starts changing color and it feels firmer. At this time, reduces heat to low, and baste your Koofteh with some of the sauce using a spoon or a ladle. Then cover the pot (tilt the lid) and let it simmer gently for about 1 hour and 30 minutes.

Notes:

  • While the meatball is being cooked, toss it gently and carefully once in a while to get it cooked evenly in all parts. You can also baste the top with the sauce occasionally. Don’t forget to cover the pot again.
  • The reason for wrapping your Koofteh Tabrizi in a cloth is to prevent it from falling apart while cooking.
  •  Instead of making a gigantic Koofteh, you can divide your mixture and make about two or three smaller meatballs in size of an orange. In that case, there is no need to use cheese cloth, just use a bowl in an appropriate size as a scoop for making meatballs. You’ll also need 1 hard-boiled egg for each meatball.
  • In case of making orange size Koofteh, have some cold water next to yourself. Add about ½ tablespoon cold water to the bowl using as a scoop, then add the mixture and continue making a ball. This way it would be easier to get your meatball out of the bowl. You just need to invert the bowl on your palm and tap it a few times. Do the same with the rest of meatballs.
  • Arrange the small meatballs in the pot with about 1 cm space in between.

17. Finally, when your Koofteh Tabrizi is cooked completely and the meat in it doesn’t smell raw, it’s ready to serve. Turn off heat and let the Koofteh sit in the pot for about 15 minute, cooling down a little bit.

Note:

At the end, there will be just about a cup of the thick sauce left in the pot.

How to Serve This Iranian Dish:

Transfer your gigantic meatball into a serving bowl or onto a deep serving plate. Then, remove the cloth and baste your Koofteh with some sauce. To garnish, use the fried onion and sauté barberries you’ve set aside. In a separate bowl, serve the remaining sauce, too. You can also shred some bread in the sauce and eat it.

As side dishes, you can have table vegetables, sliced raw onion, fresh lime/lemon or lemon juice, and pickles. The most preferred kind of bread with this Iranian dish is Sangak (a traditional Iranian bread). And about drinks, it would be Doogh (Iranian yogurt drink) as usual.

If you’ve cooked a gigantic Koofteh Tabrizi, it would be better to help your guests serving themselves by cutting it into halves or quarters. Or if you’ve prepared orange size meatballs, each person can have one in their plates. Then, spoon a small amount of it onto a piece bread and enjoy the taste. (Watch out for the pits of the prunes while eating and warn everyone about them).

It may not be a quick and effortless recipe, but it’s worth trying. You’ll love it. The wonderful flavor is convincing enough.

Ratepost

A dish of Ash-e Reshteh, Traditional Iranian Soup

ash-e-reshteh

ash-e-reshteh


Before I explain Ash-e Reshteh, I must mention this point that what’s called Ash in Iranian cuisine is a food looking like a thick soup, mainly consisting of herbs and legumes. It’s the same for Ash-e Reshteh. What’s more here is reshteh, a kind of Persian noodle. This soup is one of the most delicious, popular, and well known ones among Iranian soups, and is more preferred in winter.

This Iranian thick soup is a delicacy which has a special position among Iranian foods in different Iranian events, ceremonies, or gatherings, specifically religious ones. It’s also commonly cooked and served in Nowruz gatherings. Some people believe that noodles in this soup symbolize good fortune and success for the following days of the new year. In addition, neighboring countries also have this soup in their cuisines just with some slight differences in the recipe.

Ingredients for Ash-e Reshteh:

  • 1 cup chopped fresh chives
  • 1 cup chopped fresh parsley
  • 1 cup chopped fresh cilantro
  • 1 cup chopped fresh dill leaves
  • 2 cups chopped fresh spinach (if unavailable, substituted with chard’s leaves
  • ½ cup garbanzos, presoaked overnight
  • ½ cup rose coco beans, presoaked overnight
  • ½ cup red kidney beans, presoaked overnight
  • ½ cup lentils- 300 g. Persian reshteh (if unavailable, substituted with linguine)
  • 3 medium onions, sliced into thin slivers
  • 6 garlic cloves (optional)
  • 2 cups kashk (a whitish dairy product made from yogurt or sour milk)
  • 4 tbsps. crushed, dried mint leaves
  • Salt, turmeric powder, and hot pepper powder
  • Vegetable oil
  • 2 tbsps. wheat flour (if necessary)

Directions to Cook Ash-e Reshteh:

1. Cook the legumes in boiling water separately until tender and set them aside.

2. Fill a big pot with about 5 cups water and bring it to a boil. Then add the prepared herbs and let them simmer over medium heat until they don’t taste raw anymore. Meanwhile you can prepare the other ingredients.

Note:

  • Don’t cover the pot in this phase. If you do so, the herbs get dark brown while cooking. It’s better to preserve them greenish.

3. Heat about 2-3 tablespoons oil in a frying pan. Add the onions and stir until golden brown. Take about half of the fried onions and set them aside for garnishing. Add about ½ tablespoon turmeric powder to the remaining onions. Stir for a few more seconds and then set them aside.

4. Mince 3-4 garlic cloves. Fry them until golden brown. Then, add about 2 teaspoons turmeric powder and stir a few more seconds. Set them aside.

5. Slice the remaining garlic cloves paper-thin. Fry them until golden brown and set them aside for garnishing this Iranian soup.

6. In a small pan, heat about 3 tablespoons oil until sizzling. Add dried mint, stir a little, and remove it from heat immediately. Set it aside.

7. Go back to the herbs. Add cooked legumes, fried onions with turmeric powder, fried minced garlic, about half of the sauté mint, and some hot pepper powder (to your taste) to the pot. Stir a little to get them mixed. Let them simmer with the lid on for about 10-15 minutes. It helps the flavors come together.

Note:

  • Tilt the lid to prevent boiling over.

8. Break up reshteh strips into 3 pieces and add them to the pot. Stir them well to make sure they don’t stick together in the mixture.  Reduce heat to low and continue simmering for about 15-20 more minutes until reshteh gets completely tender.

Note:

  • After adding reshteh, the soup starts getting thick. So from this phase on, you have to stir your soup every so often to prevent the ingredients from sticking to the bottom of the pot.

9. Dilute the kashk with 1 cup water. Add about half of it to the mixture and stir. Continue heating for about 5 more minutes and then remove the pot from heat.

Notes:

  • It would be better to boil the diluted kashk for about 20 minutes before adding it to your Ash-e Reshteh.
  • Adding kashk in this phase is optional. You can use it just for garnishing.
  • You can substitute kashk with sour yogurt or sour cream. But in case of using yogurt, you can’t add it when the soup is simmering over heat because it starts to separate into curds. Use it just for garnishing.

10. When all of the ingredients are cooked completely, the flavors are intermingled thoroughly, and your Iranian soup is thick enough, you’re done.

Notes:

  • What you have at the end has to be a kind of a thick soup. So if it looks watery, dissolve the wheat flour in a cup of cold water and add it to the soup. Let the mixture continue simmering for a while until it gets the desired thickness. Just bear it in mind that Ash-e Reshteh tends to get thicker a little more by resting and cooling down. And if it looks too thick while cooking or at the end, you can add some boiling water.
  • Adjust seasoning, especially for salt, as the final phase. Because the kashk and reshteh used in this Iranian soup are a little bit salty and usually there is no need to add more salt.
  • You can adjust the amount of sauté dried mint, fried garlic, and kashk to your taste.

How to Serve Ash-e Reshteh:

Transfer the soup into a big serving bowl. Let it rest and cool down for a while and then start garnishing. Otherwise, all the toppings get mixed and don’t stay on the surface. Use fried onion and garlic, diluted kashk, and sauté mint to decorate your food.

You can have some Kashk or yogurt, vinegar, or even various kinds of pickles with this Iranian soup. In some areas of Iran like Kerman province, people mix vinegar with grape syrup and use it alongside their soup. This soup can be served as an appetizer or a main course for dinner.

Finally, if you’re searching for something special, savory, nutritious, and also vegetarian among Iranian foods, I highly recommend you Ash-e Reshteh. You’ll enjoy it.

Ratepost